How Solar Permit Design Handles Roof Obstructions: 7 Things to Check Before Module Placement
01 Oct, 2026
16 Views 0 Like(s)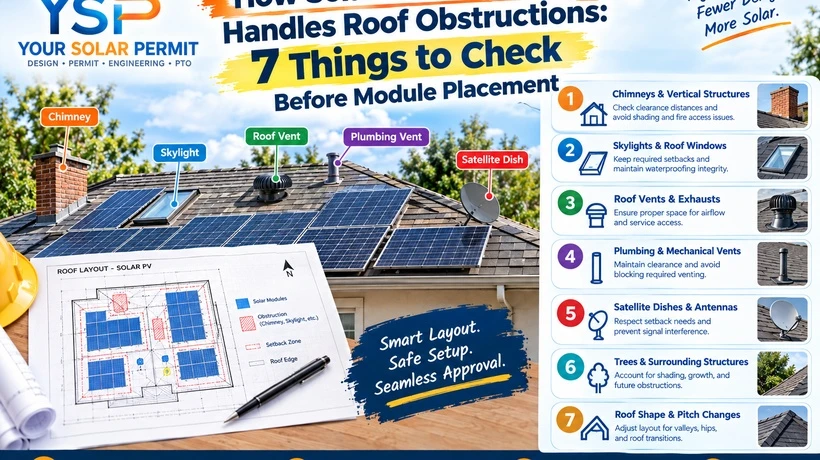
We manage anything from large-scale municipal applications to complex home rooftop installations and diy solar permit services. The process begins with a detailed client consultation, site evaluation, and financial assessment to fully grasp context.
A roof can look wide open from the street and still be surprisingly difficult to lay out for solar.
A vent lands in the middle of a row. A skylight breaks up an otherwise useful section. A dormer takes more space than expected. Then someone asks why the original module count no longer fits.
That's where Solar Permit Design needs to start with the roof that actually exists, not the roof someone hoped was there.
For U.S. residential projects, requirements can vary by AHJ and project conditions. So the smart approach isn't to copy a layout from another house. It's to understand the current roof, identify the constraints, and build the array around them.
What Counts as a Roof Obstruction?
A roof obstruction is an existing feature that occupies space or changes how the proposed solar array can be placed. Common examples include plumbing vents, skylights, chimneys, dormers, roof windows, HVAC equipment, satellite equipment, and existing roof-mounted systems.
Some features are obvious. Others aren't.
A small vent can be more disruptive than a larger object if it sits in the middle of the most efficient module arrangement. A dormer can split a roof plane and leave two awkward spaces on either side.
So the first Solar Permit Design review should identify the roof features before anyone tries to squeeze in the last few modules.
1. Start With the Actual Roof, Not the Target Module Count
One of the easiest mistakes is beginning with a sales target: “We need 24 modules here.”
That number may have come from an early proposal or preliminary imagery. It isn't necessarily the number the roof can support after every obstruction is mapped.
Start with the roof geometry.
Identify the roof planes, edges, ridges, valleys, hips, dormers, vents, skylights, and other permanent features shown in the available project information. Then build the array around those conditions.
That order matters. If modules are placed first, every newly discovered obstruction becomes a redesign.
This is also where residential solar design services can add practical value. The goal is to turn site information into a workable layout rather than simply reproduce a proposed module count.
2. Check Whether the Obstruction Changes the Usable Roof Area
Not every square foot of roof is automatically available for modules.
An obstruction may take up physical space, but its position can also affect the surrounding area. A skylight can break a row. A chimney can split an array. A dormer can create a narrow section where the planned module orientation no longer works.
So don't measure only the object.
Measure the space around it, too.
Ask whether modules can be placed on the same roof plane without conflicting with applicable access, clearance, or installation conditions. The exact requirements depend on the AHJ, adopted codes, and project configuration.
A good Solar Permit Design review therefore looks at the obstruction and the surrounding roof area as one layout problem.
3. Look at Roof Geometry Around Vents, Skylights, and Dormers
Roof geometry can turn a simple obstruction into a much larger layout issue.
A vent near the center of a rectangular roof may only require one module to move. Put that same vent near a valley, and it may affect an entire row.
Skylights create a similar problem. Their size matters, but their position often matters more. If a skylight sits between two roof features, the remaining space may not be wide enough for the module orientation originally planned.
Here's the thing: module placement should follow the usable roof geometry.
For complex projects, the designer should review the relationship between each major obstruction and the surrounding roof plane before treating the array as final.
4. Recheck Setbacks and Access After Moving Modules
Suppose a vent is found in the middle of the proposed array. The designer moves three modules toward the roof edge and solves the immediate problem.
Maybe.
The new placement may create another issue.
Whenever modules are moved because of an obstruction, recheck the applicable setbacks and access conditions. Don't assume that moving one row has no downstream effect.
Requirements vary by jurisdiction, roof configuration, and project. Current AHJ requirements should be checked rather than relying on an old template.
This is an important part of Solar Permit Design because the layout needs to solve the obstruction problem without creating a second one.
5. Make Sure the Module Count Still Matches the Electrical Design
This is where a roof change can turn into a documentation problem.
Imagine the original design had 26 modules. A chimney and two vents are then added to the roof drawing, and the final layout drops to 24.
If the electrical diagram still reflects 26 modules, the package is no longer telling one consistent story.
The same issue can affect equipment schedules, calculations, system summaries, and application information.
Your permit plan sets should reflect the final layout, not an earlier version. If the module count changes, every affected document needs another look.
Simple rule: a layout revision isn't complete until the related documentation has been checked.
6. Don't Forget Existing Equipment on the Roof
Designers naturally focus on solar modules, but existing equipment can be easy to overlook.
A property may have an old satellite dish, HVAC equipment, existing solar equipment, or another permanent roof-mounted feature. A site image may not show every detail clearly, either.
Before finalizing module placement, compare the design with the best available project information.
Photos can help. Installer notes can help. Measurements can help.
No single source should be treated as perfect when the information conflicts.
The goal is to avoid drawing a clean array over a feature that's actually sitting on the roof.
7. Review the Complete Layout After Every Major Change
This final check catches a surprising number of problems.
A designer moves several modules around a skylight and fixes the local issue. But the new arrangement changes the row length, module count, roof-plane distribution, or equipment relationship.
So step back.
Look at the whole roof again.
Does the array still make sense? Does the module count match the electrical design? Are the applicable clearances still addressed? Does the equipment location remain coordinated?
A final Solar Permit Design review should happen after the layout becomes stable, not just after the first draft is finished.
How Obstruction Mistakes Create Permit Corrections
Most layout problems aren't caused by one dramatic drafting error. They're usually the result of small assumptions piling up.
A vent is missing. A roof plane is simplified. A module is moved without updating another drawing. An old equipment model remains in the schedule.
Individually, each item may look minor.
Together, they make the package harder to review.
The best way to reduce that risk is to use a repeatable review process. Compare the roof plan with the site information, then compare the roof plan with the electrical documentation, and finally compare the project information with the application.
That sequence catches more than reviewing each sheet in isolation.
What Should Be Checked Before Module Placement?
Before modules are placed, review the roof geometry, visible obstructions, existing roof equipment, usable roof areas, and project-specific requirements.
Then consider module dimensions and orientation.
Don't force a module arrangement simply because it looked good on a preliminary proposal. If roof conditions change the layout, adjust the array and let the related documentation follow that change.
A practical Solar Permit Design workflow is:
- Review the site information.
- Identify roof planes and obstructions.
- Determine usable areas.
- Place modules.
- Check applicable layout conditions.
- Coordinate the electrical design.
- Perform a final document review.
It sounds basic. That's the point.
How YOUR SOLAR PERMIT Can Help With Roof Layouts
For installers handling multiple residential projects, YOUR SOLAR PERMIT can fit into the workflow by helping organize project information into coordinated solar permitting documentation.
Depending on the project scope, that can involve roof layouts, electrical documentation, equipment information, revisions, and pre-submission checks.
The useful part is coordination.
When an obstruction forces a layout change, the change shouldn't stop at the roof drawing. Related project information needs to be reviewed as well.
For a busy installation team, a repeatable process can make revisions easier to track and reduce avoidable back-and-forth.
When Should Solar Permit Services Review Roof Obstructions?
Roof obstructions should ideally be reviewed near the beginning of the design process, before the electrical documentation and application are locked.
Finding a skylight after the final drawings are prepared can mean more than moving a few modules. It may change the module count, system size, inverter configuration, calculations, and application information.
That's why solar permit services that include coordinated design and documentation review can be useful when a project has complicated roof conditions.
The exact scope varies by provider and project. What matters is that the final package reflects the actual roof.
Why Satellite Imagery Alone Can Be Risky
Satellite imagery is useful, but it isn't a complete site assessment.
Small vents can disappear into the roof. Skylights may be difficult to see. Recently installed equipment may not appear in older imagery. Shadows can hide details too.
If project information conflicts, resolve the uncertainty instead of designing around a guess.
Good Solar Permit Design depends on reliable inputs. A polished drawing built from incomplete site information can still be wrong.
Common Mistakes to Avoid
Designing Around a Sales Proposal
A preliminary proposal is useful, but it shouldn't override actual roof conditions. Treat the proposed module count as a starting point, not a promise.
Moving Panels Without Checking the Rest of the Package
A layout change can affect more than one sheet. Review the electrical documentation and application whenever the final array changes.
Using Old Clearance Assumptions
A previous project isn't a substitute for checking the requirements that apply to the new project.
Treating Every Roof as One Flat Surface
Complex roofs need to be evaluated by roof plane. Valleys, hips, dormers, and changes in geometry can all affect module placement.
Forgetting Existing Equipment
Look beyond the modules. Existing roof-mounted equipment can change usable space and should be represented when relevant to the project.
FAQs
What Are Common Roof Obstructions for Solar Panels?
Common roof obstructions include plumbing vents, skylights, chimneys, dormers, HVAC equipment, satellite equipment, and existing roof-mounted systems. Their location can matter as much as their size because an obstruction in the middle of an array can disrupt several modules.
Can Solar Panels Be Installed Around Roof Vents?
They may be, depending on the roof configuration and requirements that apply to the project. The vent should be shown accurately, and proposed module placement should be reviewed for applicable clearances, access, and installation conditions.
How Does Solar Permit Design Handle Roof Obstructions?
Solar Permit Design handles roof obstructions by identifying existing roof features before final module placement, determining the usable area, checking applicable layout conditions, and coordinating any resulting changes across the permit documentation.
What Should Residential Solar Design Services Check Before Module Placement?
Residential solar design services should review available roof geometry, major obstructions, existing roof equipment, usable areas, and applicable project requirements. The designer should also consider how the proposed array affects the rest of the permit package.
Why Do Permit Plan Sets Need an Accurate Roof Layout?
Permit plan sets need an accurate roof layout because the roof drawing represents the physical location of the proposed installation. If it doesn't match the site or final array, other documents can become inconsistent and harder for the AHJ to review.
Do Solar Permit Services Include Obstruction Review?
The scope varies by provider and project. Some workflows include roof layout preparation, documentation coordination, revisions, and pre-submission review, so installers should confirm exactly what is included before assigning a project.
Can a Roof Obstruction Reduce the Number of Solar Panels?
Yes. If an obstruction occupies usable space or makes the planned module arrangement impractical, the final array may need fewer modules. Any resulting change should be reflected in the relevant electrical and permit documentation.
What Happens If a Roof Obstruction Is Discovered After Submission?
The response depends on the project status and the AHJ. The design team should determine whether the obstruction changes the submitted layout and whether revised drawings or additional review are required.
Should the Electrical Design Be Updated When the Module Count Changes?
Yes, when the change affects the electrical design. A different module count can affect system capacity, inverter configuration, calculations, equipment information, and application data, so the affected documents should be checked before resubmission.
How Can Installers Reduce Roof-Layout Errors?
Start with reliable site information, map major roof obstructions before final module placement, check applicable requirements, and perform a coordinated review after major changes. A simple checklist can catch many avoidable inconsistencies before submission.



Comments
Login to Comment